Scaling up Kubernetes for research pipelines
This practical is trying to assist you to apply basic skills in Kubernetes. Hopefully, you would be able to use the sample scripts and general ideas in your projects directly. For research pipelines, there are some major considerations when moving to the clouds:
- Reading 0: Preparing Minikube VM to support NFS volumes
- Accessing large amount of data from the source:
- Scaling up:
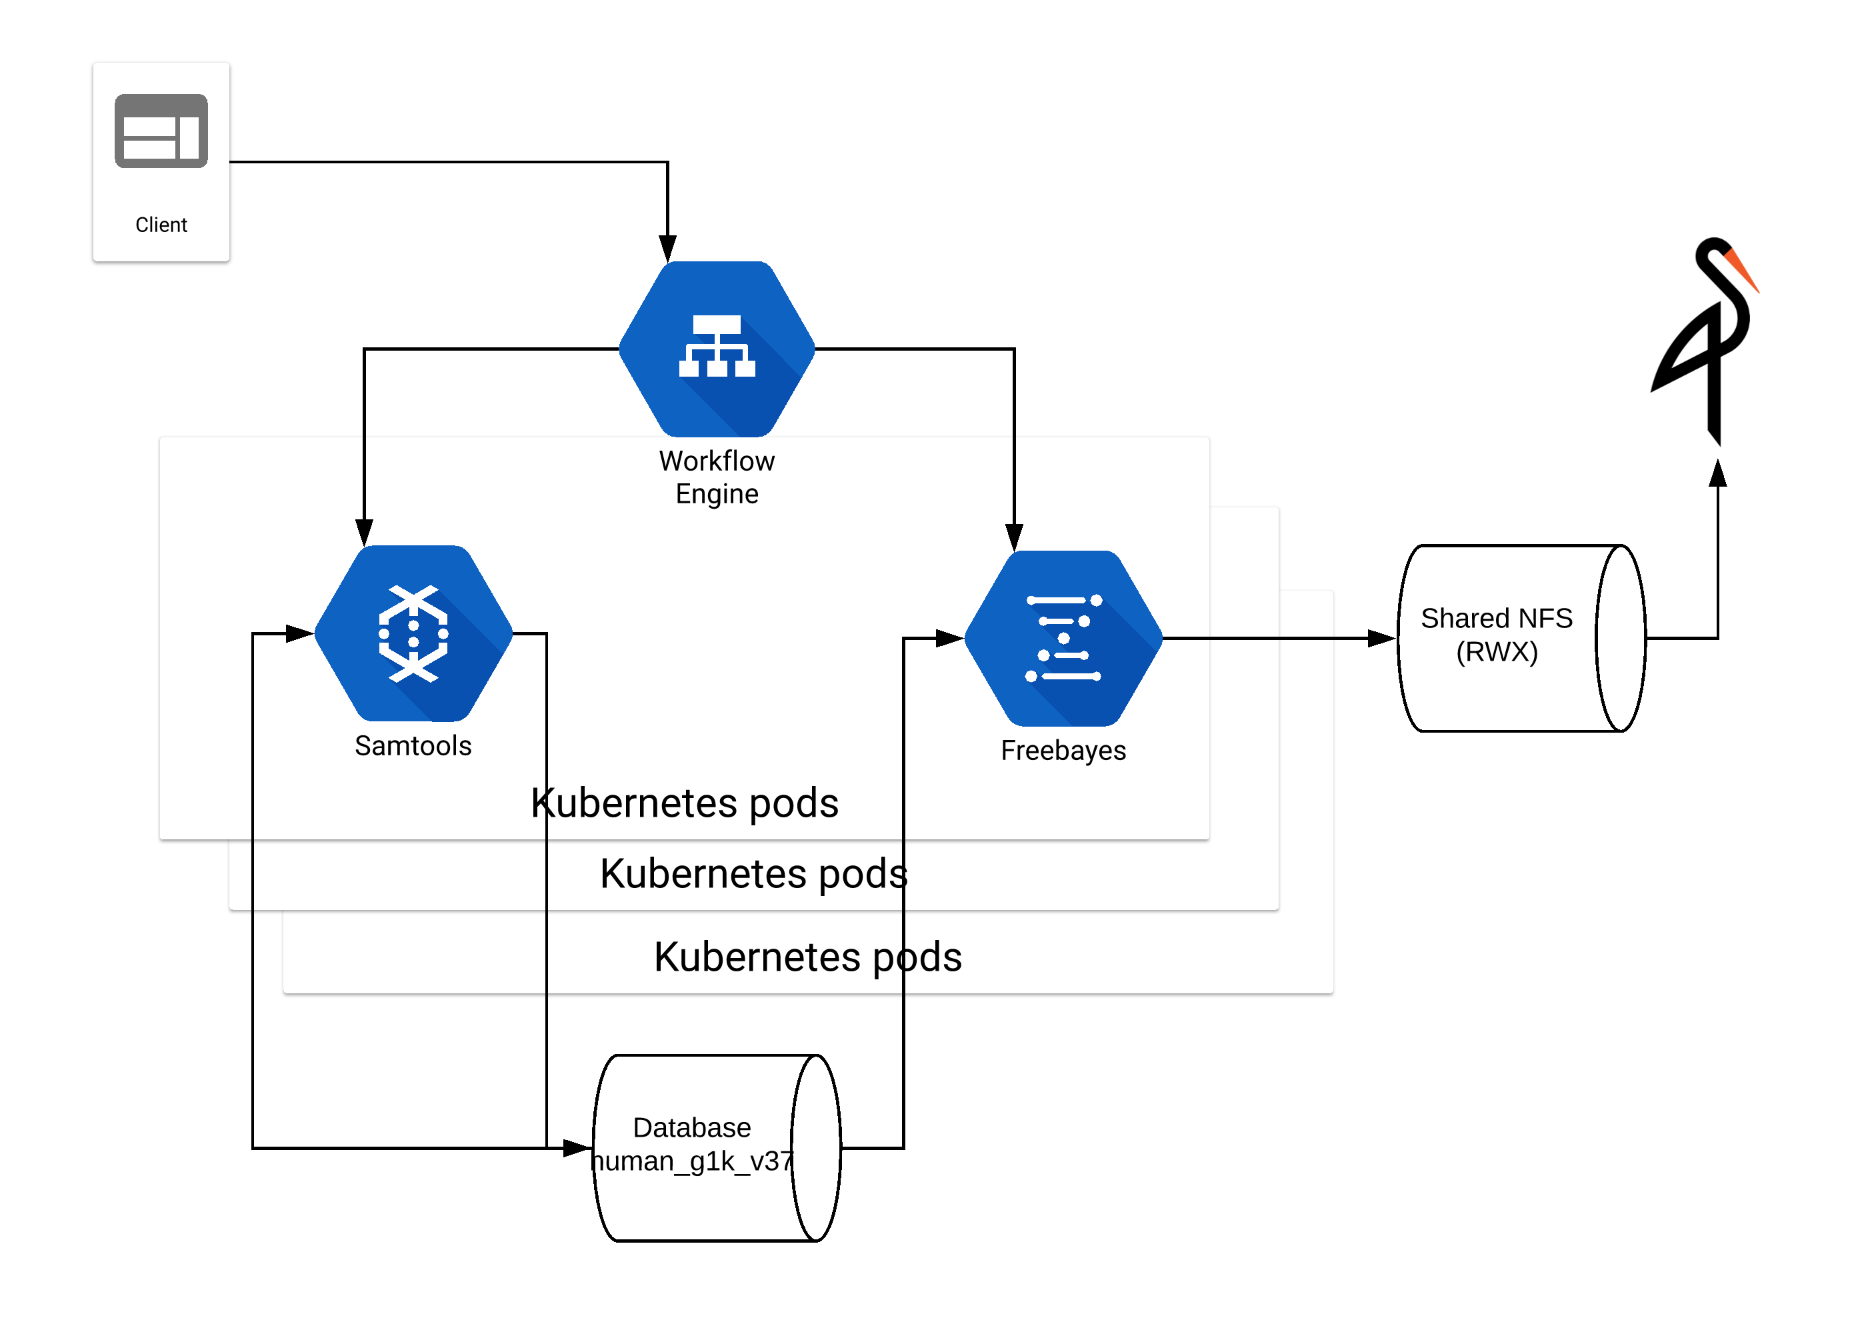
This practical is based on a project at EBI. We are creating the pipeline on both RKE and GKE. This practical is only focusing on RKE. The objective is to create a pipeline for variant calling on Kubernetes. Kubernetes need to be scaled up to schedule a large number of jobs. The containers such as Samtools and Freebayes read and write on persistent volumes serving as database and S3 buckets.
Reading 0: Preparing Minikube VM to support NFS volumes
This original exercise was designed to show user how to build a sandbox for an individual developer. This is automated to give users more time to focus on cloud-specific subjects. Read through this section so that you can build your own sandbox after the workshop. This is an continuation built on top of Reading 0: Adding Minikube to the new VMs.
Access the VMs via SSH directly if they have public IPs attached. Otherwise, use SSH tunnel via bastion server, for example ssh -i ~/.ssh/id_rsa -o UserKnownHostsFile=/dev/null -o ProxyCommand=”ssh -W %h:%p -i ~/.ssh/id_rsa ubuntu@193.62.54.185” ubuntu@10.0.0.5
Helm needs port-forward enabled by socat. NFS mount needs nfs-common on the work nodes. Install the following packages:
sudo apt-get install -y socat nfs-common
Exercise 2: ReadOnlyMany for data source
Here is a sample of PV https://gitlab.ebi.ac.uk/davidyuan/adv-k8s/blob/master/osk/dpm/pv-1000g.yml:
apiVersion: v1
kind: PersistentVolume
metadata:
name: pv1000g
spec:
capacity:
storage: 100Ti
accessModes:
- ReadOnlyMany
nfs:
server: "<host name or IP>"
path: "<mount path>"
Here is a sample of PVC https://gitlab.ebi.ac.uk/davidyuan/adv-k8s/blob/master/osk/dpm/pvc-1000g.yml:
apiVersion: v1
kind: PersistentVolumeClaim
metadata:
name: pv1000g
spec:
storageClassName: ""
accessModes:
- ReadOnlyMany
resources:
requests:
storage: 100Ti
The read-only volume bound in the beginning can be mounted by containers in a pod. There are two steps.
Apply the PersistentVolume and PersistentVolumeClaim get gain access to the data source as ReadOnlyMany or ROX:
ubuntu@resops-k8s-node-nf-2:~$ kubectl apply -f ~/adv-k8s/osk/dpm/pv-1000g.yml
persistentvolume/pv1000g created
ubuntu@resops-k8s-node-nf-2:~$ kubectl apply -f ~/adv-k8s/osk/dpm/pvc-1000g.yml
persistentvolumeclaim/pv1000g created
ubuntu@resops-k8s-node-nf-2:~$ kubectl get pv
NAME CAPACITY ACCESS MODES RECLAIM POLICY STATUS CLAIM STORAGECLASS REASON AGE
pv1000g 100Ti ROX Retain Bound default/pv1000g 37s
pvc-5ae9a98b-4669-47fb-8a5b-8e5b95a74936 50Gi RWX Delete Bound default/shared-workspace nfs-client 72m
ubuntu@resops-k8s-node-nf-2:~$ kubectl get pvc
NAME STATUS VOLUME CAPACITY ACCESS MODES STORAGECLASS AGE
pv1000g Bound pv1000g 100Ti ROX 28s
shared-workspace Bound pvc-5ae9a98b-4669-47fb-8a5b-8e5b95a74936 50Gi RWX nfs-client 72m
In the pod template, refer to the PersistentVolumeClaim pv1000g:
volumes:
- name: pv1000g
persistentVolumeClaim:
claimName: pv1000g
In the containers of samtools and freebayes, defines the logical mount point that everything running in them would see:
volumeMounts:
- name: pv1000g
mountPath: "/datasource/"
The Samtools and Freebayes, running in their containers can access the human reference genome and assemblies from the 1000 Genome Project as if local files. Again, do not apply the Deployment in the pod template in https://gitlab.ebi.ac.uk/davidyuan/adv-k8s/blob/master/osk/dpm/freebayes.yml yet. We will do that in the future.
You may have noticed that volume and volumeMount related to pv1000g are commented out in the pod template. This is because the actual mount would fail due to the network differences between the environment for our project and the Minikube.
Exercise 3: ReadWriteOnce for private workspace
All clouds provide cloud-specific volumes for ReadWriteOnce. Check the API reference for details how to use them. The syntax in Kubernetes manifest is the same as above, except for the access mode of “ReadWriteOnce”.
In many cases, ReadWriteOnce volumes are intended as a temporary directory that shares a pod’s lifetime. It is handier to use emptyDir instead of ReadWriteOnce storage volume. If Memory is used as the medium, IO can be much faster given additional memory consumption.
In the pod template in https://gitlab.ebi.ac.uk/davidyuan/adv-k8s/blob/master/osk/dpm/freebayes.yml, uncomment the volumes below:
volumes:
- name: private-samtools
emptyDir:
medium: ""
- name: private-freebayes
emptyDir:
medium: Memory
In the container of samtools and freebayes in the same file, uncomment the mount points to be used for temporary output, where “/private-samtools/” and “/private-freebayes/” are arbitrary path names as mount points. They not have to exist in your containers:
volumeMounts:
- name: private-samtools
mountPath: "/private-samtools/"
volumeMounts:
- name: private-freebayes
mountPath: "/private-freebayes/"
Apply the Deployment in the pod template in https://gitlab.ebi.ac.uk/davidyuan/adv-k8s/blob/master/osk/dpm/freebayes.yml, which may take a while:
ubuntu@resops-k8s-node-nf-2:~$ kubectl apply -f ~/adv-k8s/osk/dpm/freebayes.yml
deployment.apps/freebayes-dpm created
ubuntu@resops-k8s-node-nf-2:~$ kubectl rollout status deployment.v1.apps/freebayes-dpm --request-timeout=60m
Waiting for deployment "freebayes-dpm" rollout to finish: 0 of 3 updated replicas are available...
Waiting for deployment "freebayes-dpm" rollout to finish: 1 of 3 updated replicas are available...
Waiting for deployment "freebayes-dpm" rollout to finish: 2 of 3 updated replicas are available...
deployment "freebayes-dpm" successfully rolled out
Note that emptyDir is not a persistent volume. It uses the local storage of memory where a pod is running on. Thus, kubectl get pv or kubectl get pvc does not know if and how emptyDir is mounted. You would need to connect to the pods to see the mounted volume, for example “/private-freebayes/”:
C02XD1G9JGH7:adv-k8s davidyuan$ kubectl get pod
NAME READY STATUS RESTARTS AGE
freebayes-dpm-c69456659-c9x9d 2/2 Running 0 2m38s
freebayes-dpm-c69456659-lmmcj 2/2 Running 0 2m39s
freebayes-dpm-c69456659-xj2qh 2/2 Running 0 2m38s
listening-skunk-nfs-client-provisioner-79fb65dd79-86qgq 1/1 Running 3 65d
minio-freebayes-8dd7db8f4-5jvbd 1/1 Running 0 2m39s
nfs-in-a-pod 1/1 Running 7 40d
C02XD1G9JGH7:adv-k8s davidyuan$ kubectl exec -it freebayes-dpm-c69456659-c9x9d -c freebayes -- bash
root@freebayes-dpm-c69456659-c9x9d:/# ls -l /
total 75
drwxr-xr-x 1 root root 4096 Jul 10 02:26 bin
drwxr-xr-x 2 root root 4096 Jun 14 2018 boot
drwxrwxrwx 5 1000 1000 86 May 31 16:00 datasource
drwxr-xr-x 5 root root 380 Jul 15 10:41 dev
drwxr-xr-x 1 root root 4096 Jul 15 10:41 etc
drwxr-xr-x 15 root root 4096 Jul 12 15:50 freebayes
drwxr-xr-x 2 root root 4096 Jun 14 2018 home
drwxr-xr-x 1 root root 4096 Jul 10 02:27 lib
drwxr-xr-x 2 root root 4096 Jul 8 03:30 lib64
drwxr-xr-x 2 root root 4096 Jul 8 03:30 media
drwxr-xr-x 2 root root 4096 Jul 8 03:30 mnt
drwxr-xr-x 2 root root 4096 Jul 8 03:30 opt
drwxrwxrwx 2 root root 4096 Jul 15 10:40 private-freebayes
dr-xr-xr-x 209 root root 0 Jul 15 10:41 proc
drwx------ 2 root root 4096 Jul 8 03:30 root
drwxr-xr-x 1 root root 4096 Jul 15 10:41 run
drwxr-xr-x 2 root root 4096 Jul 8 03:30 sbin
drwxr-xr-x 2 root root 4096 Jul 8 03:30 srv
dr-xr-xr-x 13 root root 0 Jul 15 10:46 sys
drwxrwxrwt 1 root root 4096 Jul 12 15:53 tmp
drwxr-xr-x 1 root root 4096 Jul 8 03:30 usr
drwxr-xr-x 1 root root 4096 Jul 8 03:30 var
drwxrwxrwx 4 root root 38 Jul 15 10:41 workspace
Exit out of the container.
Exercise 4: Initialising persistent volumes
There is no life-cycle management for persistent volumes in Kubernetes. The closest thing is command array in initContainers. Here is an example to create a subdirectory on a mounted volume /workspace/, in the pod template in https://gitlab.ebi.ac.uk/davidyuan/adv-k8s/blob/master/osk/dpm/freebayes.yml:
initContainers:
- name: init
image: busybox
command: ["/bin/sh"]
args: ["-c", "mkdir -p /workspace/result/"]
volumeMounts:
  - name: shared-workspace
    mountPath: "/workspace/"
Be careful when using multiple initContainers instead of one to configure the pod. The behaviour can be puzzling.
Connect to a pod to see a subdirectory is created on the mounted volume:
ubuntu@resops-k8s-node-nf-2:~$ kubectl exec -it freebayes-dpm-7ff686fdcf-b7w95 -c freebayes -- bash

root@freebayes-dpm-7ff686fdcf-b7w95:/# ls -l /workspace/
total 4
drwxr-sr-x 2 nobody 4294967294 4096 Jul 16 14:17 result

root@freebayes-dpm-7ff686fdcf-b7w95:/# ls -l /workspace/result/
total 0
Exit out of the container.
Exercise 5: Kubernetes secret & S3 interface
To integrate Freebayes with other pipelines requiring S3 bucket, or to review output easily via a browser, Minio can be mounted to the storage for shared output. The manifest in the pod template and the container as the same as in Exercise 1: ReadWriteMany for shared output.
Kubernetes can store secrets and use them in manifest referring to them. Check the online help kubectl create secret –help for more details. We need access key and secret key for Minio deployment:
kubectl create secret generic minio --from-literal=accesskey=YOUR_ACCESS_KEY --from-literal=secretkey=YOUR_SECRET_KEY
secret/minio created

resops49@resops-k8s-node-17:~/adv-k8s/osk$ kubectl get secret
NAME                                     TYPE                                  DATA   AGE
default-token-4wmbq                      kubernetes.io/service-account-token   3      7d18h
minio                                    Opaque                                2      52s
nfs-nfs-server-provisioner-token-7mk47   kubernetes.io/service-account-token   3      6m41s
The Minio container will get the access key and secret key securely from the environment when it is initialised. See container arguments in https://gitlab.ebi.ac.uk/davidyuan/adv-k8s/blob/master/osk/dpm/minio.yml:
env:
  # MinIO access key and secret key
  - name: MINIO_ACCESS_KEY
    valueFrom:
      secretKeyRef:
        name: minio
        key: accesskey
  - name: MINIO_SECRET_KEY
    valueFrom:
      secretKeyRef:
        name: minio
        key: secretkey
Make sure that the arguments to initialize the container must refer to the same mount point /workspace/ as in the previous exercise. Then, the subdirectories will be treated as S3 buckets by Minio:
containers:
  - name: minio
    image: minio/minio
    args:
      - server
      - /workspace/
Apply the Deployment for Minio to turn the shared persistent volume in ReadWriteMany mode into a S3 storage:
ubuntu@resops-k8s-node-nf-2:~$ kubectl apply -f ~/adv-k8s/osk/dpm/minio.yml
deployment.apps/minio-freebayes created
service/minio-freebayes created

ubuntu@resops-k8s-node-nf-2:~$ kubectl get svc
NAME                         TYPE        CLUSTER-IP       EXTERNAL-IP   PORT(S)                                  AGE
kubernetes                   ClusterIP   10.96.0.1        <none>        443/TCP                                  5h35m
minio-freebayes              NodePort    10.100.108.50    <none>        9001:30037/TCP                           53s
nfs-nfs-server-provisioner   ClusterIP   10.109.187.100   <none>        2049/TCP,20048/TCP,51413/TCP,51413/UDP   3h43m

ubuntu@resops-k8s-node-nf-2:~$ kubectl get deployment
NAME              READY   UP-TO-DATE   AVAILABLE   AGE
freebayes-dpm     3/3     3            3           28m
minio-freebayes   1/1     1            1           4m42s
If you have had VNC enabled in Exercise 0.1: (Optional) Enabling GUI for VNC, you should be able to access MinIO via Firefox at http://10.100.108.50:9001. Note that the IP address is different in every deployment. You should be able to log on with YOUR_ACCESS_KEY and YOUR_SECRET_KEY defined earlier in this exercise.
Exercise 6: Horizontal scaling
Kubernetes is an orchestration engine. It is understandable that it provides limited capability for workflow management. Kubernetes and some simple shell-scripting can scale pods and schedule jobs to be run in parallel:
kubectl get pod
dpmname=$(kubectl get deployment -o name | grep -m 1 freebayes | cut -d '/' -f2)
kubectl scale deployment ${dpmname} --replicas=4
kubectl get pod
If there were three pods before the scaling, you should see one more pod initialized to reach the total number of replicas to 4:
NAME                                                      READY     STATUS     RESTARTS   AGE
freebayes-dpm-c69456659-c9x9d                             2/2       Running    0          167m
freebayes-dpm-c69456659-fckgx                             0/2       Init:0/1   0          3s
freebayes-dpm-c69456659-lmmcj                             2/2       Running    0          167m
freebayes-dpm-c69456659-xj2qh                             2/2       Running    0          167m
listening-skunk-nfs-client-provisioner-79fb65dd79-86qgq   1/1       Running    3          66d
minio-freebayes-8dd7db8f4-5jvbd                           1/1       Running    0          167m
nfs-in-a-pod                                              1/1       Running    7          40d
If you run kubectl get pod in about 1 minute, you should see the new pod is running and ready.
In Bash script, you can then send jobs into each container in round-robin. This is the most simple-minded job scheduling. This shotgun approach can overwhelm pods easily. Jobs scheduled can fail due to lack of resources or timeouts. It is work-in-progress to integrate Kubenetes cluster with a workflow engine.
Reading 1: Vertical scaling
Kubernetes performs vertical scaling automatically to allocate addintional CPU, memory to a pod as needed. You can set minimum and maximum limits to resources as shown in https://gitlab.ebi.ac.uk/davidyuan/adv-k8s/blob/master/osk/dpm/freebayes.yml:
resources:
  requests:
    cpu: 1
    memory: 2Gi
  limits:
    cpu: 4
    memory: 8Gi
If there are many pods to manage, allocating resources in manifest can go out of control quickly. You may want to leave the resource allocation and pod scheduling to Kubernetes in most cases.
There is a limitation in Minikube. You would not be able to run kubectl top due to missing heapster service. Otherwise, you would see something like the following:
C02XD1G9JGH7:~ davidyuan$ kubectl top pod freebayes-dpm-7c87bcf4c6-rkfz2 --containers
POD                              NAME        CPU(cores)   MEMORY(bytes)
freebayes-dpm-7c87bcf4c6-rkfz2   samtools    0m           0Mi
freebayes-dpm-7c87bcf4c6-rkfz2   freebayes   0m           2Mi
Exercise 7: Autoscaling
Kubernetes has certain capability of autoscaling. The following script creates horizontal pod autoscaler to manage autoscaling policies:
max_pods=5
dpmname=$(kubectl get deployment -o name | grep -m 1 freebayes | cut -d '/' -f2)
kubectl autoscale deployment ${dpmname} --cpu-percent=50 --min=1 --max=${max_pods}
kubectl get hpa

NAME            REFERENCE                  TARGETS         MINPODS   MAXPODS   REPLICAS   AGE
freebayes-dpm   Deployment/freebayes-dpm   <unknown>/50%   1         5         0          4s